Home Mrs. Unger's Unbelievable Elementary Experiences! Meet The Teacher Classroom Tour Contact Me Image Map


Sunday, June 3, 2012

Goodbye Room 105 - LOTS of Classroom Photos!

These last couple of weeks have been so bittersweet.  My life is in a complete transition phase.

On a personal note, my husband and I are expecting our first baby... any... day moment... now.  He is five days overdue and we are all so anxious to meet him!  If he does not arrive before tomorrow evening, we have an appointment at the hospital to get the ball rolling with medical help.  I still cannot believe I am going to be a mommy in no more than two days!

Due to the fact that this baby could come at any moment, I have been on maternity leave since his due date (only six days ago).  I miss my students.  I miss my classroom.  I am not sure how I am going to handle being at home for three months.

On a professional note, there are also major changes.  I had thought when I return to work in September, I would be returning as a Third Grade teacher.  However, that is no longer happening, for reasons I prefer to not "get into" on my blog.  I am extremely disappointed and have shed many tears over all of this.  But the good news is, I am still employed.  I will return in the Fall as my school's Title 1 Math teacher.  I am trying my best to keep my head up and stay positive that this will all work out for the best.  My husband and I are hoping this position may even allow for more time with my own little guy.

Anyway... enough of that.  Once this school year is over, I will be going back to break my classroom down, pack, take things home, bring things up to my new office, etc.  So I took lots of pictures of my Kindergarten classroom, so I can remember it always as I had it.  Goodbye Room 105!


This is the view from the main doorway.


I was lucky enough to have a coat room / storage area.  It was not always that crowded, but I was housing some boxes that were supposed to get moved up to my third grade room.  Not sure what I am going to do with all that stuff now...


Ignore my mess of boxes.  Like I said, those were temporary.  I took this picture because I was fortunate enough to have TWO sinks in my classroom.  :)


We had our very own bathrooms!  :)  Yes, I was a spoiled Kindergarten teacher.


Wow!  This looks so unorganized from this photo, but really it was super organized.  These are all my guided reading materials.


These are the students' cubbies with our Radius Center on top.  I feel like a broken record, but that mess on the counter behind the cubbies was temporary.  I guess I should have taken these photos earlier in the year!  Things got crowded toward the end of the year and right before my maternity leave.


This table housed our "Boo Boo Basket," our "Crayon Lost and Found," our "Pencil E.R.," Kleenex, hand sanitizer... you get the picture.


One of the best moves I ever made was when I moved all four computers to one table and utilized the second long table (pictured here) as a small group work area.


I loved all the storage space in this classroom!


Here you can see more storage.  I used the counter as an area to organize my materials for the week.


And here we have... more storage, LOL!  This was the space behind my teacher desk.


I am proud to say that my teacher desk was always clean and organized!  I never left at the end of the day without making sure it was in order.  :)


In an attempt to keep my kids interested in the classroom library the ENTIRE school year, I would keep some books by my desk and introduce them whenever we started a new Reading theme.  It worked!  They loved when I brought out a basket of "new" books.


These shelves housed the students' Poetry Binders, workbooks, whiteboards, and teaching materials - most of which I never looked at.  I do not like teaching from teacher texts!


It is hard to tell from this picture, but those books are all Math related.  I used old rulers as dividers.  I labeled the rulers, using permanent marker, by Math topic.  So when we started learning a new topic, I would take out all the books I had that matched that Math topic.


This is our Word Work Center.  It used to be one of the kids' favorites, when we had a gumball machine / high-frequency word activity there.  But when the electricians were replacing the lights in our classroom in April, one of them knocked over and broke the gumball machine.  Bummer.  :(  I replaced that activity with a stamping / high-frequency word activity that the kids enjoy, but it is not the same.


This is our big book stand - a treasure one of my colleagues found in our school basement!  You can see our "Mystery Letter Box" beneath the stand.


I love our windows!  We have three huge windows in our classroom.


This is our big book rack.  I made it using a rolling clothes rack, but I just did not add the extension poles.  The books are hung using clothes hangers with strong clips.  By the way - I do not recommend putting this many books on the stand.  It makes it too difficult for the students to see and select books.  I should have removed some of these books a long time ago.


Do you ever look around your classroom and think, "I STILL have not updated that!?"  Ugh... that is what I think when I look at this corner of my room.  That ugly yellow paper has been there since I moved into my classroom THREE years ago.  Oh well... too late now, haha!


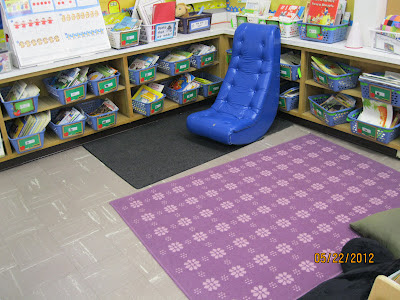
This is our classroom library.  It is not as cute and cozy as I had imagined it would be - maybe three more years and I would have made it just perfect, LOL!  Anyway, I like how big it is.  It used to be much smaller until I did some rearranging, I think, last summer.


Here is another view of our classroom library.


These pocket charts were critical for Literacy Centers and Math Centers.  They reminded us where the students were assigned to go each day.


Did I mention how lucky we were to have so much storage and shelving built right into the room?


This is the portable whiteboard that we used during whole group teaching.


This is the wall that housed everything we needed for our Calendar Time.


I recommend purchasing a stool, if your little ones have a difficult time reaching the SmartBoard.  The Dora the Explorer bucked store all of our pointers for the SmartBoard.


Here is our SmartBoard - something we (including my students) used during instruction on a daily basis.  The pocket chart on the left displayed our carpet seating chart - mostly for sub teachers, when I was absent.


The table is our Phonemic Awareness Center.  The red crates (to the left of the table) stored the binders that we used on a daily basis during Calendar Time.  At the top of the photo, you can see our Bucket Filling "stuff."  Whenever I saw my class doing something extraordinary, I put a "warm fuzzy" (pom pom ball) in the bucket and when the bucket was full, we celebrated with a party!


Here is an under-utilized whiteboard.  I should have thought of a way for the students to use this.  Oh well... it displayed our homework chart.


This is our Big Book Center and Kitchen area.  Do you see the REAL cash register?  I purchased it at a Scholastic Book Fair for $5.00!


The right side of this counter was home to our Writing Center.  The left side of the counter as well as under the counter housed our Sponge Activities.


This is our Computer Center.  How lucky are we to have FOUR computers and our very own printer!?  :)  You can also see our "Tattling Turtle."  He sure did get a workout this year!


Here you can see part of our Word Wall.  The red, mobile cart on the right is our Felt Board Center.  The wooden cart on the left housed our Math Center Tubs.  The counter was primarily used for our Letters and Sounds Center.


That door leads to our supply closet.  The white paper that hangs from the board on the floor was used for the Overhead Projector Center.


This counter is where I stored materials for Guided Reading and small group instruction.


Here is our U-shape table - a critical piece of furniture!  I learned early on in my first year of teaching how important it is to have a comfortable chair here!


We have two long strips of cork in the hallway for displaying student work.


My students put together money poems.  I highly recommend posting your district's targets or learning objectives whenever you hang student work in the hallway!  It allows parents, your principal, and others to see the connection between the curriculum and the fun activity your kids completed.  You can see I have done so in this photo (in the middle).


Welcome to Room 105!  You can see to the very right, we have a small table in the hallway for pulling students for one-on-one interventions and assessments.  On that table, we display "Room 105's Hot Read," which are class books that we wrote and illustrated.  We do these books at least once a month.


Okay, so here is a better photo of our hallway table.


We also have a bulletin board in the hallway to display student work.  The letter "Qq" was the last letter we formally learned in Kindergarten.  Here you can see we created a quilt of sorts, using Q-tips and quilt (fabric) pieces.

Well, I guess that is it.  I hope you enjoyed this final tour of Room 105!  If you have any questions or comments, send them my way.  As always, thank you for stopping by.  :)

Now I am off to walk, walk, walk and try to work this baby out!!


Sunday, May 13, 2012

My kiddos LOVED this easy-to-implement activity! Check it out!

Agh!  I cannot believe I have let almost an entire month slip by me without posting anything new on my blog.  In my defense, however, I am nine months pregnant and expecting baby any day!  (How exciting!!)  Also, my work situation has been scary and stressful lately.  (Not exciting.)  Anyway, I hope you forgive me!

So I saw this cute idea on Pinterest.  Click HERE to go to the pin.  It looks like the original idea and photo came from Tammy at "Forever in First," though the Pinterest link does not take you back to Tammy's post about this cute idea.  I guess you would have to search around her blog to find it.


Anyway, this idea is a neat twist on the traditional Venn Diagram.  Instead of using your whiteboard or chart paper, you use your students!  Here is what we did:  I named one student the "penny" and another student the "nickel."  Our "penny" and "nickel" linked arms.  All the other students shared things they knew about the penny, the nickel, or both.  I wrote all of their information and knowledge of sticky labels.  The students who shared the information were then allowed to come up and stick the label to the "penny" or the "nickel" or both.  They ALL thought this was hilarious!!  And in the meantime, I was able to informally assess their understanding of our current Math topic.  A formative assessment that was FUN and ENGAGING for my Kinders!?  How about them apples!?

Here is a picture of my cutie-patootie "nickel" and "penny."  (I hate that I have to cover their precious faces.)


We did this activity again!  This time we compared the nickel and the dime.


This activity was too awesome to stop!  Here are a couple more of my kiddos acting as a "dime" and a "quarter."


Easy, right!?  Try it out.  If you do, I would love to know how it works for you and your kiddos!

Thanks for stopping by.  :)


Tuesday, April 17, 2012

Share Chair "How-To" with Pictures and a FREEBIE!

Especially now that I am switching to Third Grade next school year, I am really LOVING the idea of a "Share Chair."  If you are unfamiliar with the idea... it is simply a special chair that students sit in when reading their writing pieces aloud to the class.  Here is an example of a "Share Chair" that I found online that I love:


If you search "Share Chair" on Pinterest or Google, you will be able to find many more examples.  There are so many cute ones out there, but I wanted one that could be folded up and put away when not in use (since my new Third Grade classroom is MUCH smaller than my current Kinder classroom).  So I purchased this at Big Lots for... I think... $14, sounds about right.


Well, I am not much of an artist, so these are the steps that I took to ensure that I came up with something that was semi-fun and kid friendly.

1 - I found a font that I liked and typed the words "Share Chair" in a Word document.  I printed the words extra large and then taped the papers to the top of the chair.


2 - I traced the words with a thick permanent marker, ensuring that the ink bled through on to the chair.


3 - I used acrylic paints and thin paint brushes from JoAnn Fabrics (Don't forget to use your teacher discount there!) to paint the inside of the letter outlines.


I am super sad because when the purple paint dried, it looked totally black!  Boo hoo hoo!

4 - I traced the outline of the letters with puffy paint.


I had an oopsie on the letter "I"...darn it!  I am hoping it dries clear!

5 - I added some dots around the letters with the puffy paint.  I wish I had an artistic hand, so I could paint cool designs, but I decided to keep it simple with dots.


Here is the semi-finished product!  I still plan to tie some fun ribbon around the white bars to "spice" it up a bit more!  If you have any more EASY ideas on how I can make this "Share Chair" more fun for my kiddos, I would love to hear them!!


Okay, now on to your FREEBIE!  If you have been reading any of my recent posts, then you already know that I have recently been doing a lot of planning for next school year.  I am changing grade levels (Kinder to Third Grade) and I will be on maternity leave during the first month of school (July at my school).

Anyway, something I just finished is a "Classroom Rules Brainstorming Sheet."  I love the idea of my students brainstorming, developing, and writing their own classroom rules, but I know I will probably get blanks stares looking back at me if I do not scaffold this activity.  So to help my kiddos with their thinking, I created this brainstorming sheet.  The idea is not my own... I read about it in "The First Six Weeks of School" written by Paula Denton and Roxann Kriete.


Anyway, if you would like to grab this FREEBIE, please visit my Teachers Pay Teachers Store (where everything is always free) by clicking HERE!


Maybe it is just my pregnancy hormones flaring up, but I was a little crushed to see 909 pageviews on my blog, 230 views on TPT, and 120 downloads on my previous freebie and ZERO comments.  * tear*  So if you are able to use this freebie in your classroom, I could use a little love in the form of a comment.  <3

Thanks for stopping by!  :)


Sunday, April 15, 2012

Grab this classroom management FREEBIE!

As a Kindergarten teacher the last three years, I have had the luxury of having a boys and a girls bathroom right in my classroom.  I have been fortunate to be able to ignore the constant complaints during staff meetings that involve shared hallway bathrooms.

Well... that privilege will be coming to a quick hault for me soon.  Boo hoo hoo!!!  When I switch to Third Grade next year (July 2012 for our school), I will have to figure out a completely new bathroom procedure.

I listened enough to the complaints at staff meetings to know that one problem with intermediate students is HOW OFTEN they are in the hallway because they are supposedly in need of the bathroom.  I would like to nip that problem in the bud before it even starts in my classroom!  I saw the perfect inspiration on Pinterest:


I am not sure where the idea originally came from because, when I click on the picture, it does not lead to a blog or anything.  :(  So if this idea is yours, please let me know and I will - of course - give you the credit you deserve!

Anyway, I wanted to "cute" it up, so I created my own "Emergency Bathroom Trips" poster.  I plan to...

1 - Print this little creation (including the numbers, not pictured here) on our color printer at school and on cardstock.

2 - Cut out and laminate the cardstock.

3 - Arrange and attach the printables on a thick, cute strip of ribbon (running vertically), so that the poster is on top, then the "1," the "2," the "3," and finally the "4" at the bottom.


The AMAZING and FREE border came from "The 3am Teacher Graphics".  I am in LOVE with this newly found blog! 


Photobucket
 
 
Anywho... if you would like your own copy of my FREEBIE, be sure to visit my Teachers Pay Teachers Store (where everything is always free) by clicking HERE!
 
Thank you for stopping by!  :)  If you are able to use this freebie in your own classroom, I would love to hear about it!


Monday, April 9, 2012

She shopped, she scored! Plus a FREEBIE for you!

Oh... my... goodness, blogging friends!  I cannot tell you how excited I am right now!  Here is why:

I have been wanting to make those crate seats for a long time now.  (You know what I am talking about, right?  Seems like every teacher has them, except me.)  Here is an example:


I asked my dad if he would help me make these (he is super handy) and he was willing to help.  However, he was nervous about what would happen if a student fell through and was injured on a "teacher-made" seat.  (Unlikely, but you cannot blame a daddy for worrying about the well-being of his little girl, hehe.)  So I became somewhat discouraged about making these cute creations.

Then... I saw another interesting picture on Pinterest that came from Pam's blog, My Second Home. 


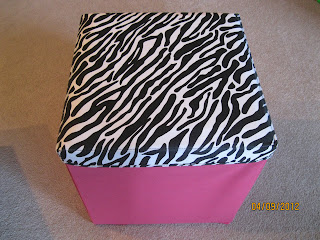
Pam said she found these ADORABLE storage seats at Big Lots, so I have been meaning to stop by that store forever now.  Well... I was driving passed a Big Lots today and thought to myself, "Fat chance that I will actually find those storage seats, but the hubby is at work and I have some free time.  Eh, why not give it a shot?"  (If you are a Big Lots shopper, you know how AWESOME that store is, but you also know how random their shipments are.)  But wouldn't you know it, I found them!!!


Don't you just LOVE the colors and designs!?  They were $15 each, but like Pam mentioned on her blog, I would much rather spend $15 than spend the time and energy making these things.  (I wish I was creative like many of you awesome bloggers / teachers, but I just do not have it in me!)  I would have liked to get more than two, but this was all they had in the store today.  I will keep checking back.


I also scored some other things for my classroom.  I am switching to Third Grade next year, so I am all about this "Share Chair" idea that I see all the time on Pinterest (a special chair students sit in when they are sharing writing pieces with the class).  I found this bright and cheery beach chair at Big Lots that I will eventually decorate to become our "Share Chair."


I am hoping my friend will help me paint it to make it look cute.  (Did I mention I am not creative?)  Best of all - these things all fold up, which is wonderful because my new classroom is WAAAAAAY smaller than my current classroom (boo hoo hoo).


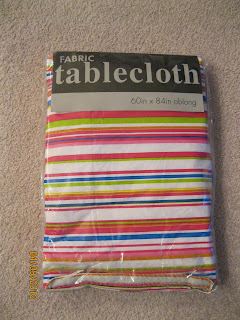
I am a huge fan of tableclothes.  I love how I can throw a tablecloth over a table and it really brings life to that area... so easy, so inexpensive!  I found this cute tablecloth today at Big Lots for a few bucks.  I am going to put it on the main table in our classroom in the "Central Station" area.


Okay, now on to other matters...

Did you see Marlana's FREE "Chocolate Bunny Activity" on her blog, Lil Country Kindergarten?  Head over to her blog to grab it!  I used this activity with my kiddos and they LOVED it!  (Duh... they got to eat chocolate.)


Here are some pictures of what we did in our classroom, using Marlana's activity:


We labeled the parts of a chocolate bunny.  I did this on chart paper and my Kinders did the same on their own copies.


I then gave each student a chocolate bunny (I found 3-packs at the Dollar Tree).  I instructed them to take ONE bite out of their bunny.  Then, they decorated their own bunnies and cut off a piece of the bunny to show where they took a bite.  Finally, we graphed the results.  As you can see, our data was completely lopsided!  Next time, I will encourage the kids to take a bite out of ANY part of the bunny.  (And, in case you are wondering... yes, I let my students finish eating their bunnies, hehe.)

Well... if you have read this whole post, you definitely deserve a FREEBIE!  I created some organizational sheets for my teacher planning binder that look like this:


If you would like to grab your own copy of these pages, visit my Teachers Pay Teachers store (where everything is always free) by clicking HERE!  If you would like to add more pages to your own collection, contact me and I will happily send you the Word version.

Phew!  That turned out to be a LONG post.  Thanks for sticking around and, as always, thank you for stopping by!  :)


Friday, April 6, 2012

A FREEBIE For You - Table Group Name Signs

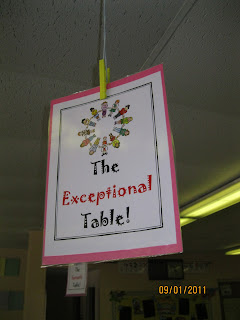
So in my Kindergarten classroom, each table of students chooses a new group name every 3 weeks (which is how often our Reading themes change).  I create more than enough signs, so each table has a choice.


I really like using table names because they help with transitions.

The table signs pictured above would be fine for my new 3rd grade classroom (I will switch to 3rd grade, starting in July), but all the other themes I used in Kindergarten are too primary for 3rd grade.  Soooooo... it is time to create new ones!

Michelle over at "The 3am Teacher" has shared some AWESOME border frames for free... along with a ton of other cool freebies!  I used them to create new signs.  Here is one example:


If you would like to view and download the other table group name signs I created, please visit my TPT Store to grab them for FREE by clicking HERE!

I hope you can use this freebie in your classroom.  Thanks for stopping by!  :)